
1. Keyboard Malfunction or Garbled Input
Solution:
Restart the device to check if functionality resumes.
If the issue persists (keyboard unresponsive or garbled), replace the keyboard.
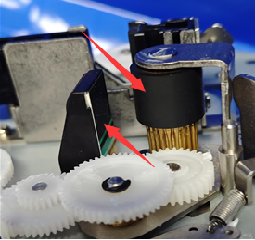
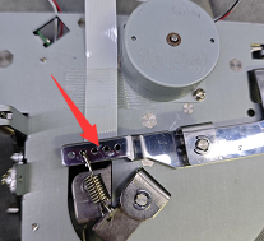
2. Cutter Abnormalities
Possible Causes & Solutions:
If the cutter malfunctions, it may be due to:
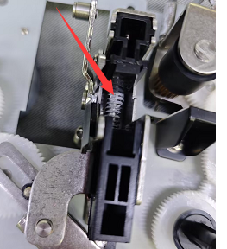
Faulty Cutter Sensor Board → Return to factory for replacement.
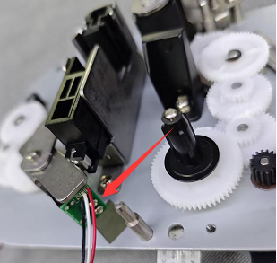
Cutter Push Frame Jammed → Manually push the frame. If stuck, apply a small amount of lubricant.
Foreign Object in Cutter Gears → Disassemble and clean the gears.
Mainboard Issue → Return to factory for inspection/repair.
Motor Failure → Replace the motor.
3. Ribbon Depletion or Undetected Consumables
Possible Causes & Solutions:
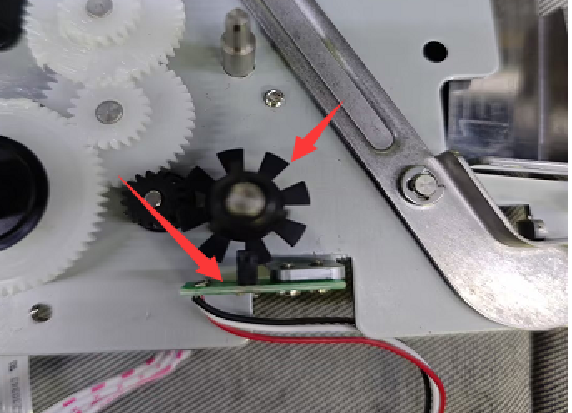
Ribbon sensor board failure → Replace the sensor board.
Ribbon drive roller malfunction → Replace the drive roller.
4. Tube Feeding Issue or Misaligned Cutting (Cutting into Text)
Possible Cause:
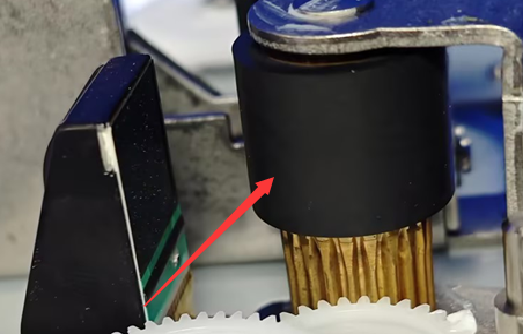
Dirty print roller causing slippage, leading to misalignment or incorrect cutting.
Solution:
A. Power off the device.
B. Clean the print roller with a cotton swab dipped in alcohol.
C. Restart and test printing.
If misalignment persists, replace the print roller.
5. Poor Print Quality
Possible Causes & Solutions:
A. Dirty Print Head or Roller
Clean the print head and print roller with a lint-free cloth and alcohol.
If print quality remains poor, proceed to next steps.
B. Insufficient Print Head Pressure
Disassemble the unit and adjust the pressure spring position on the roller swing arm to increase pressure.
(Note: If unsure, return to factory for adjustment.)
C. Worn/Damaged Print Head or Roller
If the print head is scratched/worn or the roller is worn out, replace the component.
(Return to factory for replacement.)
6. No Power (Failure to Boot)
Troubleshooting Steps:
A. Check the Power Adapter
Use a multimeter to test the adapter’s output voltage.
If no voltage is detected → Replace the adapter.
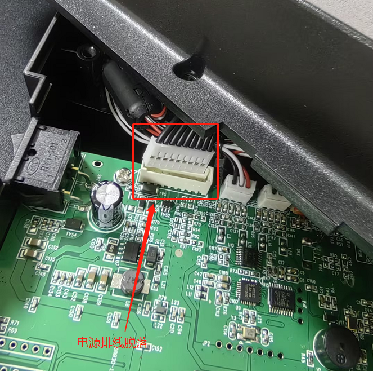
B. Inspect Internal Power Connections
Open the device and check if the power cable is loose or disconnected.
If detached → Reconnect the power cable securely.
C. Test the Power Button
Ensure the button is functioning properly (no physical damage or stuck mechanism).
D. Motherboard Failure (Last Resort)
If all above steps pass but the device still won’t power on → Return to factory for motherboard inspection/repair.
7. No Text Printed (Blank Output)
Troubleshooting Steps:
A. Test the Print Head
Replace the print head to check if it’s faulty.
If printing resumes → Defective print head (return for replacement).
B. Inspect the Motherboard
If the print head is functional, check Q3 & Q4 components on the motherboard.
If issues are found → Return for motherboard repair.
8. Garbled Text on 4mm² Sleeve (Font Size 5 "W")
Solution:
Upgrade the firmware and font library to resolve compatibility issues.